


לעברית לחץ כאן
Chickpeas in Space
Last February, a unique experiment that tested how chickpeas can be grown far from Earth took off into space.
The experiment was part of the AX1 mission, during which Eytan Stibbe arrived at the International Space Station and conducted dozens of diverse experiments.
We invite you to recreate this experiment at home using the attached kit!
Why grow chickpeas in space?
Colonies in space are a goal that is already visible on the horizon. When such colonies are established, it will be necessary to provide their inhabitants with food. Therefore, space farming will become essential in the coming years and decades, and we must learn how to do it. And why chickpeas? Because it is a superfood that contains most of the essential nutrients for humans!
What does the experiment comprise?
There is no soil or flowing water in space to sustain the development of plants. The experiment examines whether it would be possible to grow chickpeas on an artificial substrate containing soil substitutes, water and nutrients (fertilizer).
In addition, when a plant is grown in the field, it has a large area at its disposal where it can develop. In a spaceship, on the other hand, growth space is limited, so it is vital to control the plants' growth rate. It should grow fast enough to provide food, but not too fast. Through this experiment, we shall examine the effect of lighting on the growth rate, primarily the differences between normal white light and red light.
what should you do
The kit you received includes:
How to prepare the light boxes
Equipment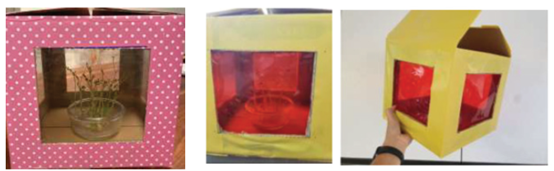
How to prepare the growth substrate
Must be done with the assistance of an adult
Equipment and materials
How to disinfect the chickpea seeds
Must be done with the assistance of an adult
Equipment and materials
Planting the seeds and the germination
Important - to prevent contamination of the growth substrate:
Observation and Follow-up
Follow the chickpea sprouts' development in the two growth boxes and examine the differences between them. Pay attention to the following characteristics:
How would you recommend space pioneers grow their chickpeas? Why?
Did you manage to go through all the steps and finish the experiment? Well Done!
Take photos of different stages during the experiment, send us the pictures, and we will publish your story on our Facebook page!
Chickpeas in Space
Last February, a unique experiment that tested how chickpeas can be grown far from Earth took off into space.
The experiment was part of the AX1 mission, during which Eytan Stibbe arrived at the International Space Station and conducted dozens of diverse experiments.
We invite you to recreate this experiment at home using the attached kit!
Why grow chickpeas in space?
Colonies in space are a goal that is already visible on the horizon. When such colonies are established, it will be necessary to provide their inhabitants with food. Therefore, space farming will become essential in the coming years and decades, and we must learn how to do it. And why chickpeas? Because it is a superfood that contains most of the essential nutrients for humans!
What does the experiment comprise?
There is no soil or flowing water in space to sustain the development of plants. The experiment examines whether it would be possible to grow chickpeas on an artificial substrate containing soil substitutes, water and nutrients (fertilizer).
In addition, when a plant is grown in the field, it has a large area at its disposal where it can develop. In a spaceship, on the other hand, growth space is limited, so it is vital to control the plants' growth rate. It should grow fast enough to provide food, but not too fast. Through this experiment, we shall examine the effect of lighting on the growth rate, primarily the differences between normal white light and red light.
what should you do
The kit you received includes:
- A bag with growth substrate mixture enriched with fertilizer
- A bag of chickpea seeds
- Preparing the boxes with which you can control the light reaching the plants
- Preparing the growth substrate - you will use the mixture to create a gel, where you will plant the chickpea seeds. The substrate will provide the plants with the water and nutrients they need.
- Disinfecting the chickpea seeds - it is important to do so to prevent the development of molds and contaminations
- Planting the seeds in the substrate and germination
- Observation and Follow-up
How to prepare the light boxes
Equipment
- 2 cardboard boxes at a width and height of approximately 25-30 cm
- Viewfoils or clear cellophane
- Red cellophane
- A 30cm-ruler
- A box knife
- Wide masking tape
- Draw a window on each side of the box (four windows). Leave a 4cm margin from each end.
- Use the box knife to cut open the windows on each side.
- Measure the windows, then cut the viewfoils or cellophane to a size slightly larger than the windows.
- Glue the viewfoils or cellophane pieces from the inside of the box, so they would cover the windows you have just cut open. Glue transparent viewfoil or cellophane to all window cuttings of one box and red cellophane onto the windows of the other box.
How to prepare the growth substrate
Must be done with the assistance of an adult
Equipment and materials
- Liquids measuring tool (you may use a baby bottle)
- A pot or heatproof vessel containing approximately 1.5 liters
- 4 round or rectangular aluminum trays measuring 12-15 cm
- A stick or metal spoon for stirring
- Timer
- Distilled or boiled and cooled water
- Pour the growth substrate mixture from the small bag into the pot and add 1 liter of distilled or boiled water. Use the stick to stir the solution until it is uniform. Cover the pot with aluminum foil and leave a small opening for air to penetrate.
- Boil the agar (gelatinous substance) for 3-4 minutes, remove from the heat and stir with a clean stick until there are no lumps in the solution. Turn on the heat again and boil for another 30 seconds.
- Pour the solution into the aluminum trays. Leave to cool at room temperature until the substrate becomes a gel.
How to disinfect the chickpea seeds
Must be done with the assistance of an adult
Equipment and materials
- Liquids measuring tool (you may use a baby bottle)
- Bleach (liquid, not a "Javel" like cream)
- Distilled or boiled and cooled water
- a clean cup
- Prepare the disinfectant solution: pour 10 ml of bleach into a 100 ml measuring cup and add distilled water to reach a 100 ml volume. Mix the solution well.
- Put the seeds in the cup and add the disinfectant solution until the seeds are submerged. Leave the chickpea seeds in the solution for 2 minutes.
- Pour the solution out carefully and add water to the cup, up to about a third of the height. Shake the glass slightly in a circular motion to wash the seeds, then pour the water carefully. Repeat the rinsing process 3-4 times.
- Repeat twice: Rinsing with disinfectant solution + rinsing with water (steps 2-3).
Planting the seeds and the germination
Important - to prevent contamination of the growth substrate:
- Work with clean disposable gloves or use disinfected tweezers.
- Do not bring your face close to the growth substrate.
- Make 10 holes or dimples in the substrate in each tray (you may use a wide drinking straw).
- Insert the disinfected Chickpea seeds in the holes up to half the height of the seeds with the plumule (the protrusion in the seed) placed horizontally to the substrate, as shown in the drawing.

- Cover the aluminum trays with cling film (to prevent contamination) and punch four small holes for ventilation.
- Place the trays in a dark environment for 2-3 days. To avoid contamination of the growth substrate with bacteria and fungi, avoid removing the cling film during this period.
- Place the light boxes in an illuminated place and place two trays into each box. Remove the cling film from the trays.
Observation and Follow-up
Follow the chickpea sprouts' development in the two growth boxes and examine the differences between them. Pay attention to the following characteristics:
- Germination day
- Plant's color (how intense is the green color)
- Plant's height
- Plant's growth direction
How would you recommend space pioneers grow their chickpeas? Why?
Did you manage to go through all the steps and finish the experiment? Well Done!
Take photos of different stages during the experiment, send us the pictures, and we will publish your story on our Facebook page!